Navigate360
Navigate360 is your step-by-step guide to the college experience at Cascadia College from orientation to graduation. With Navigate360, everything you need to succeed is right at your fingertips.

Access Your Account
Log in to Navigate360 with your student network account, same login as your CANVAS and student email account.
Watch the Video
What Can a Student Do with Navigate360?
Advising Appointments
You can schedule appointments with your academic advisor at any point, directly through the app or the web browser!
My Docs
This is where you can find your notes and appointment summaries of your meetings with advisors, faculty or support staff. After each meeting, you’ll receive a summary outlining the key points discussed, next steps and any action items. It serves as a record to keep you organized and on track with your academic goals!
Academic Planner
The Academic Planner helps you map out your courses and track progress toward your pathway/degree. It provides a clear plan for future terms, allowing you to align your course selections with your academic and career goals. Stay on track and make informed decisions about your academic journey. Learn more about the Academic Planner
Tutorials
To schedule either an in-person or virtual appointment:
- Log in to Navigate360 with your Cascadia Student email (@student.cascadia.edu) and password.
- Select Appointments from the menu.
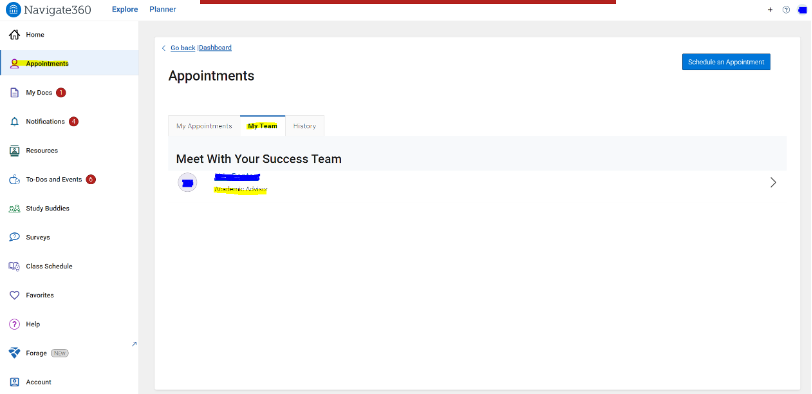
- You should now see the Appointments screen. Select the My Team tab.
- Your Success Team will now appear. Select the person labeled as Academic Advisor.
Meet With Your Success Team - On the New Appointment screen, you will select a service.
- Select a date.
- Select Find Available Time.
- You will now see a list of days and times that the Advisor has available. You can either meet with your advisor in-person at the Kodiak Corner, or on Zoom. To change the meeting modality, go to the How would you like to meet? dropdown after the calendar on the menu.
- To pick an appointment, select the time box on the day that you want.
- Review appointment details and confirm! Opt-in for a text/email reminder. You can also add comments or specific questions for your Advisor.
The Academic Planner helps you map out your courses and track progress toward your pathway/degree. It provides a clear plan for future terms, allowing you to align your course selections with your academic and career goals. Stay on track and make informed decisions about your academic journey.
This tutorial walks you through creating a draft of your Educational Plan using Navigate360. The Educational Plan is a quarterly map of classes you will take to work toward your educational goals at Cascadia. That may be admission requirements at your transfer school or training program, Associate degree requirements, and/or High School graduation requirements if you are in Running Start.
- Log in to Navigate360 with your Cascadia Student email (@student.cascadia.edu) and password.
- At the beginning of the screen, after the Navigate360 logo, select “Planner”
- A gear wheel icon can be selected and a video tutorial will appear to show all these steps.
- Check “My Goals” in My Planner. If the listed degree is incorrect, please submit the Program Update Form. You can continue working on your Educational Plan even if your degree goal needs
to be updated.
My Planner
Cascadia has created a template for every pathway available in each degree. Templates list the requirements and electives needed to complete the degree and the desired pathway. Adding a template will give you an outline of the classes you need.
- In the navigation menu is the “Planning Tools” panel, select “Add Templates.” A list
of all templates are available.
Planning Tools - A list of templates will appear in the panel. Templates with a Green Star are programs that match your current academic goal.
- To add a template from the list, select the “+” button. If using a keyboard, you can also search for a template using the search bar Template Search (by keyword).
- Templates with a Green Star icon are programs that match your declared program and
catalog year. If the starred template isn’t your Goal Program, go through the options,
find the template, and select the “+” button.
Add Templates - If you’ve already added a template to your list, it will appear as Added.
- Once you’ve added a template(s) it is added to the Planning Tools menu panel, select
the one you wish to use and select “View Selected Templates”. If you select or deselect
a checkbox, the Selected Templates Details will automatically update in the panel.
Selected Templates
Your selections are saved automatically, for when you log in again.
- Add the Academic Terms you expect to take classes. In My Academic Plan panel, select
the more options button (three dots). Select “Add a Term,” and select the terms to
add them to your academic plan, include all terms you plan to attend Cascadia. Note:
many Associate degrees take up to 8 terms to complete if attending full time. You
can add more terms later, if you need another term for classes.
Add a Term - In the Selected Templates panel, there may be some classes marked as “Matched.” These
are classes you are currently enrolled in at Cascadia, or classes you have already
completed at Cascadia.
Selected Templates with matches - If you have credits from another school, or test scores (AP/IB/Cambridge), these will eventually appear in your “matched”
column once they are officially evaluated by Cascadia. Until then, you can mark a
requirement as “met,” you can wait to complete this step with your Advisor, if you
prefer. Please ask your Advisor if your prior credits and/or test scores might be
applied toward your degree at Cascadia.
Selected Templates with Mark As Met
Next, you’ll add classes into future quarters to plan out your educational goals. We recommend that you find your program pathway for additional information on how to plan classes. This section is broken into two options:
Option 1: Adding courses using the Planner Template
- The Selected Template panel outlines the Course Map recommendations for your selected
academic goal.
Course Map - For the course(s) that fulfill the template slot’s requirements, select the arrow
next to a slot to expand.
Template Slot’s Requirements - To add a course to your academic plan, select the check box for the course you want
to add and select “Add to Term,” then select the term from the menu that opens. You
can also add multiple courses to a single term.
Add to Term
Option 2: Manually Adding Courses to your Plan
- In the Planning Tools pane, expand the Course Catalog option by selecting the arrow. Then select Search for Courses.
-
A search page with various filters appears in the panel. (We suggest you use the Subject or Department filter, and not the Keyword filter.)
When searching for more than one attribute (for example course code and keyword), the search returns courses that meet ALL of the attributes, not ANY of the attributes. If you try a search and end up with no results, try removing one or more attributes to expand your search.
- After searching, results appear. You can add results to a term by ticking the course
and selecting the Add to Term button or the more options button (three dots) next
to the course.
Your Academic Plan automatically saves as you create it.
We advise you meet with your assigned advisor after creating your Academic Plan. Remember, your Academic Plan is a draft; map it out to the best of your ability. It’s okay if it’s not perfect! Make a list of questions you want to ask your advisor during your appointment. You did it!